
There is a moment every homeowner knows well — you walk into your kitchen, glance at the cabinets, and think: these have got to go. But then you look at renovation quotes and your heart sinks. The good news? You don’t need to gut your kitchen to make it look brand new. Learning how to upgrade kitchen cabinets with smart, budget-friendly techniques can transform the entire feel of your home without replacing a single box.
Whether you’re dealing with flat, builder grade cabinets that never had an ounce of personality, or outdated oak cabinets from 2003, kitchen cabinet upgrades don’t have to mean a full tearout. In fact, some of the most jaw-dropping kitchen makeovers you’ll find online were achieved with nothing more than paint, cabinet trim, and a few clever end cabinet solutions.
In this guide, we’ll walk through every major method — from adding trim to kitchen cabinets to finishing exposed cabinet ends, installing cabinet base molding, and everything in between. Whether you’re a confident DIYer or a weekend warrior just getting started, there’s a strategy here that will work for your space, your skill level, and your budget.
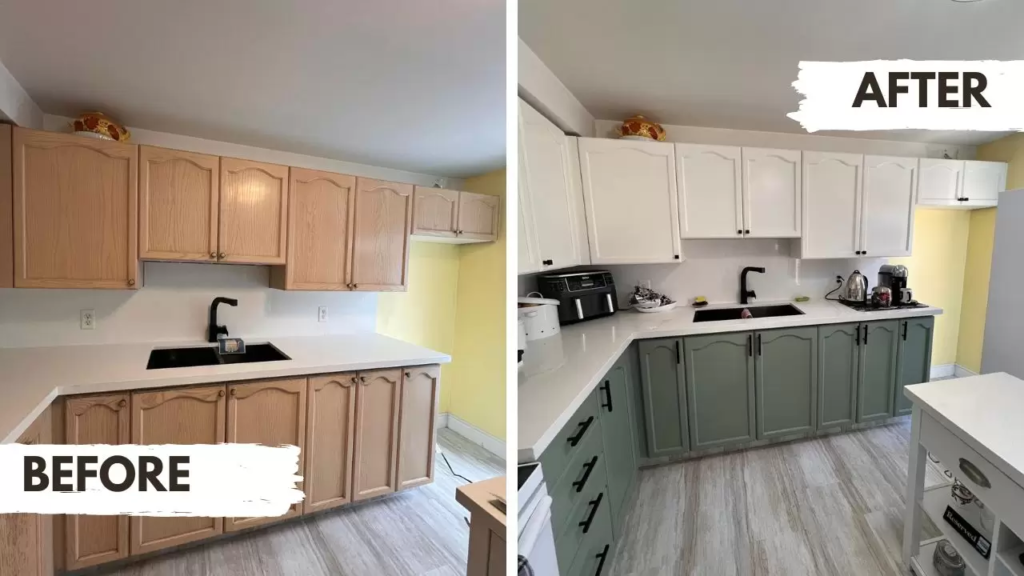
Before and after: upgrading kitchen cabinets with paint, new hardware, and cabinet trim can completely transform a dated kitchen — no full renovation needed.
Why Most Kitchens Are Begging for a Cabinet Update
Let’s be honest: most kitchens built between the 1990s and 2010s were fitted with the most basic, cost-saving cabinets possible. These builder grade cabinets were designed to be functional, not beautiful. They’re flat, they’re plain, and they have zero architectural detail.
The problem isn’t always the cabinet boxes themselves — it’s the lack of finishing detail. No cabinet trim pieces, no cabinet base molding, no finished cabinet end panels, and no kitchen cabinet floor trim to ground the installation. The result is a kitchen that looks like it came flat-packed and was never truly “finished.”
Here’s what’s fascinating: according to the National Association of Realtors, a minor kitchen remodel returns roughly 72–81% of its cost at resale — but a full replacement rarely hits that same ratio. That means thoughtful cabinet upgrades using trim, molding, and paint can actually be smarter investments than tearing everything out and starting over.
How to Upgrade Kitchen Cabinets: Start With a Plan
Before you pick up a miter saw or order supplies, it helps to audit your kitchen. Ask yourself:
- Are the cabinet boxes structurally sound, or are there soft spots, warps, or broken hinges?
- Are the cabinet sides exposed anywhere, especially at the end of a run?
- Is there a visible gap between the bottom of the base cabinets and the floor?
- Do the doors look flat and plain, or do they already have some raised-panel detail?
If the boxes are solid — and most are — then you’re a perfect candidate for a cabinet upgrade using trim and finishing techniques. Here’s how to approach it step by step.
Modernize Kitchen Cabinets With Paint and New Hardware
The single highest-return move you can make when you modernize kitchen cabinets is a combination of paint and new hardware. It sounds simple, and it is — but the results are genuinely dramatic.
Choosing the Right Paint for a Cabinet Update
Not all paint is created equal for cabinetry. A cabinet update done with the wrong paint will chip, yellow, and peel within a year. Always opt for a high-quality alkyd or waterborne alkyd paint formulated specifically for cabinetry — brands like Benjamin Moore Advance or Sherwin-Williams Emerald Urethane are top choices used by professional cabinet painters.
For color, soft whites (like Simply White or Chantilly Lace), warm greiges, and deep navy or forest green tones are leading the charge in 2024–2025. If you have kitchen cabinets with trim details, painting them a contrasting color — say, white cabinets with black or brass trim — creates a custom, high-end look.
Hardware Makes It Look Custom
Swapping out knobs and pulls is the fastest ways to update kitchen cabinets with essentially zero skill required. Brushed brass, matte black, and unlacquered brass are all having major moments right now. If you’re going for a shaker-style or transitional look, cup pulls on drawers and simple bar pulls on doors tie everything together beautifully.
Adding Trim to Kitchen Cabinets: The Game-Changer Most People Overlook
If there’s one technique that separates a truly polished kitchen from a mediocre one, it’s adding trim to kitchen cabinets. Trim adds shadow lines, visual weight, and architectural detail that makes cabinets look like they were custom-built.
What Is Cabinet Trim and Why Does It Matter?
Cabinet trim refers to any molding or decorative strip applied to the face, top, bottom, or sides of cabinet boxes. It includes crown molding at the top of upper cabinets, cabinet base molding at the bottom of lowers, cabinet side trim on exposed ends, and trim for cabinets applied directly to flat door faces.
Most builder grade cabinets ship without any of this. When you walk into a high-end kitchen and think “those cabinets look expensive,” nine times out of ten it’s because of the trim work — not the cabinet boxes themselves.
How to Add Trim to Cabinet Doors
Adding trim to cabinet doors — also called applying overlay molding — is one of the most popular DIY cabinet trim projects for good reason: the materials cost under $100, it requires minimal tools, and the before-and-after difference is extraordinary.
Here’s the basic process for how to add trim to cabinets:
- Measure and mark — Determine the placement of your trim frame on each door. A 2-inch border from the door edges is a classic starting point.
- Cut your molding — Use a miter saw to cut the four pieces of your chosen cabinet trim at 45-degree angles for clean corner joints.
- Dry-fit first — Always lay your pieces on the door before gluing to verify the fit.
- Attach with adhesive and nails — Apply wood glue to the back of each trim piece, press firmly, and use a finish nailer or brad nailer to secure. Fill nail holes with wood filler.
- Caulk the seams — Run a thin bead of paintable caulk along every seam where trim meets door for a seamless, painted finish.
- Prime and paint — Prime before painting to ensure adhesion, then apply two coats of your cabinet-grade paint.
This is the essence of adding trim to kitchen cabinet doors, and when done carefully, it transforms flat slab doors into something that looks shaker-style or craftsman-inspired.
💡 Pro Tip: When adding trim to cabinets before and after photos are your inspiration, pay attention to the trim profile chosen. A simple square-edge stop bead gives a modern shaker look; a more ornate cove or beaded profile leans traditional.
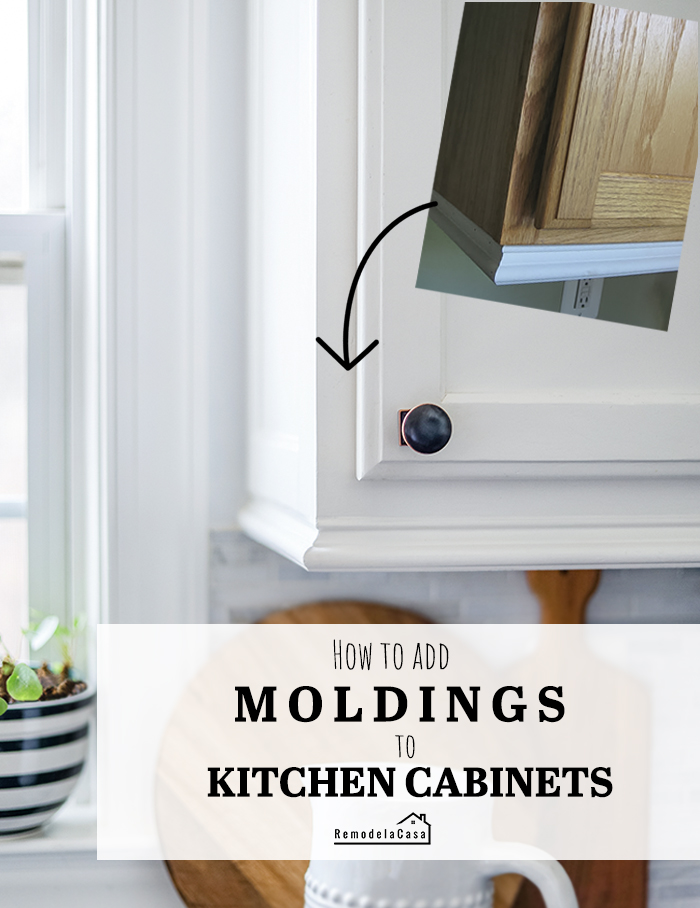
Adding trim to kitchen cabinet doors is one of the easiest DIY cabinet upgrades — flat slab doors become shaker-style with just molding, wood glue, and paint.
How to Finish Cabinet Ends: The Most Neglected Part of Any Kitchen
Walk around your kitchen and look at where a run of base or upper cabinets ends against a wall, a peninsula, or an island. That raw, unfinished cabinet side is one of the most overlooked details in kitchen design — and fixing it is one of the most impactful things you can do.
End of Kitchen Cabinet Ideas That Actually Work
There are several excellent approaches to finishing a kitchen end cabinet:
1. Cabinet End Panel Skins
Cabinet end panel skins are thin sheets of matching or complementary wood veneer, MDF, or laminate that you glue directly over the raw cabinet side. They’re the fastest solution, particularly when you need a clean, flat finish. DIY cabinet end panels using this method can be completed in a weekend.
2. Framed Panel Construction
For a more architectural look, build a simple frame-and-panel assembly using solid wood rails, stiles, and a center panel. This approach mirrors the look of your cabinet doors and creates stunning visual continuity. Many of the best kitchen cabinet end panel ideas you’ll see online use this technique.
3. Decorative Beadboard or Shiplap
For a farmhouse or coastal aesthetic, applying beadboard or shiplap to an end cabinet kitchen surface creates lovely texture and character. Finish it with the same paint as your cabinets for cohesion.
4. Tile on Cabinet Sides
Yes — tile on cabinet sides is a real thing, and it looks incredible when done well. Subway tile, zellige, or even patterned encaustic tile applied to the side of kitchen cabinet that faces a dining room or open living space creates a genuine showstopper detail.
5. How to End a Row of Cupboards With a Furniture Foot
Adding a decorative furniture foot at the base of an end cabinet corner — combined with a cabinet base trim and a filler panel — creates the illusion of a freestanding furniture piece rather than a built-in run. This is one of the most popular end of cabinet ideas in transitional and traditional kitchens.
Cabinet Base Molding and Floor Trim: Grounding Your Kitchen
Look at the bottom of your base cabinets. Is there a gap between the cabinet toe kick and the floor? Is the transition between cabinet and floor abrupt and unfinished? This is where cabinet base molding and kitchen cabinet floor trim come in.
Understanding Your Options for Cabinet Base Trim
Cabinet base trim is the molding applied along the very bottom of base cabinet runs, where the toe kick meets the floor. It serves both aesthetic and functional purposes: it covers any gaps caused by uneven floors, it protects the toe kick from mop water and foot traffic, and it ties the kitchen cabinetry to the floor visually.
Here are the main cabinet base molding options:
- Quarter round on cabinets — A quarter round is a simple, quarter-circle molding profile. Kitchen cabinet quarter round is the most common and affordable solution, fitting neatly into the crevice where the toe kick meets the floor. Quarter round kitchen cabinets work in virtually every style from modern to rustic.
- Base shoe molding — Slightly flatter than quarter round, base shoe is a more refined option that sits more subtly at the floor transition.
- Built-up base molding — Layering a cabinet baseboard with a cap molding on top creates a more traditional, furniture-like base. Kitchen baseboard ideas using this layered approach are popular in craftsman and colonial-style homes.
Cabinet Base Trim Ideas for Different Kitchen Styles
- Modern/Minimalist — Skip the molding entirely and use a shadow gap or a very thin, flat base cabinet trim in the same color as the cabinet.
- Transitional — A classic cabinet baseboard with a simple ogee or cove cap looks polished without feeling ornate.
- Traditional/Farmhouse — Go bold with a layered kitchen cabinet base molding that includes a baseboard, a cap, and a cabinet bottom trim with a bead detail.
💡 Pro Tip: When installing any kitchen cabinet baseboard or base cabinet trim, always leave an expansion gap if your kitchen has hardwood floors. Gluing trim directly to hardwood can cause buckling as the wood expands seasonally.
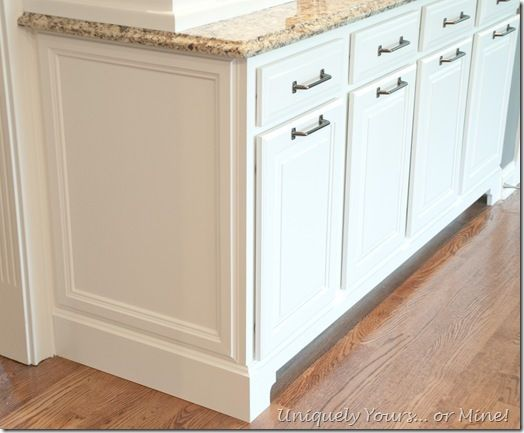
Complete cabinet finishing detail guide — from cabinet end panel skins and cabinet side trim to base cabinet trim, quarter round, and kitchen cabinet baseboard installation.
DIY Cabinet Trim Projects: What to Put on Bottom of Cabinets
One of the most-searched questions in the kitchen design world is simply: what to put on bottom of cabinets? Homeowners see that unfinished bottom edge of upper cabinets or the raw toe kick face of base cabinets and know something is missing — they just don’t always know what.
How to Add Trim to Bottom of Kitchen Cabinets
How to add trim to bottom of kitchen cabinets is a straightforward project. Here’s what you need:
- A chosen molding profile (cabinet bottom trim, base shoe, or quarter round)
- Miter saw (or a hand saw with a miter box for small runs)
- Construction adhesive and finish nails
- Paintable caulk and paint to match
The process for trimming kitchen cabinets at the base:
- Measure the total linear footage of your cabinet base trim run.
- Cut outside corners at 45 degrees (mitered) and inside corners using a coped joint or a mitered return.
- Test-fit all pieces before committing to adhesive.
- Apply construction adhesive to the back of each piece, press firmly against the toe kick face, and secure with a nail gun.
- Fill all nail holes, caulk all seams, prime, and paint.
Kitchen Cabinet Side Panel Ideas: Beyond the Basic Box
The side of cabinet that faces your kitchen entry, a dining area, or a hallway is prime real estate for design detail. Here are the best kitchen cabinet side panel ideas to consider.
Cabinet Gable Ends and Kitchen Gable Ends
Kitchen gable ends are the finished panels used on the outermost visible sides of cabinet runs. Upgrading these — whether by replacing a cabinet end panel or adding an overlay — is one of the most effective cabinet modifications you can do.
For upper cabinets, consider:
- A full-overlay cabinet end panel in matching wood or paint
- A framed panel that mirrors your door style
- Decorative corbels or brackets below the kitchen end cabinet to create a furniture look
For base cabinets, consider:
- Cabinet side trim strips that frame the panel and add visual weight
- A faux furniture leg at the corner
- Wainscoting panels or beadboard on end cabinets that face an open space
How to Replace or Add Cabinet End Panels
Replacing a cabinet end panel is a more involved project but incredibly rewarding. Steps include:
- Remove any existing toe kick trim and side trim carefully.
- Cut your new panel to size — typically 3/4-inch plywood or MDF finished on one side.
- Apply construction adhesive to the existing cabinet side face.
- Press the new panel into place and secure with finish nails driven from inside the cabinet.
- Fill holes, prime, and paint. DIY cabinet end panels done this way can look completely professional.
Ways to Update Kitchen Cabinets: Full Strategy Roundup
Here’s a consolidated overview of every cabinet update strategy, organized from easiest to most involved:
Quickest Wins (Weekend Projects)
- Paint cabinets with a proper alkyd or waterborne alkyd finish
- Replace hardware (knobs, pulls, hinges)
- Add quarter round on cabinets at the floor transition
- Apply cabinet end panel skins to exposed sides
Intermediate Projects (1–3 Days)
- Adding trim to cabinet doors for a shaker or raised-panel look
- Installing cabinet base molding along the toe kick
- Adding cabinet side trim to exposed end cabinet kitchen faces
- Installing a kitchen cabinet baseboard with cap molding
More Involved Upgrades (1–2 Weekends)
- Building framed cabinet end panels with stile-and-rail construction
- Adding kitchen gable ends with decorative corbels
- Replace cabinet end panel with new MDF or plywood and full repaint
- Installing crown molding or kitchen cabinet trim molding at the ceiling line
Premium DIY or Hire Out
- Add cabinets to kitchen runs for more storage
- Installing add on kitchen cabinets (filler cabinets or pantry columns)
- Complete kitchen cabinets upgrade including glass inserts, interior lighting, and rollout shelves
FAQs About How to Upgrade Kitchen Cabinets
Can I upgrade kitchen cabinets without replacing them?
Absolutely. In fact, most upgrade kitchen cabinets projects involve zero replacement. Painting, adding cabinet trim, installing cabinet base molding, finishing cabinet ends, and updating hardware can make original cabinets look custom and brand new. The key is using the right materials and taking time with prep and finishing.
What is the easiest way to modernize kitchen cabinets?
The easiest combination is paint plus new hardware. These two changes alone — especially when combined with adding trim to kitchen cabinets — account for the most dramatic before-and-after results. A satin or semi-gloss alkyd paint in a timeless color, paired with matte black or brushed brass hardware, is the formula used in thousands of successful kitchen cabinet updates.
How do I finish the side of kitchen cabinets?
Finishing the side of kitchen cabinet runs involves one of several methods: applying cabinet end panel skins, building a framed panel overlay, using tile on cabinet sides, or installing cabinet side trim pieces to frame and detail the exposed face. The right choice depends on your budget, skill level, and the style of your kitchen.
What is cabinet base molding and do I need it?
Cabinet base molding (also called kitchen cabinet baseboard or cabinet bottom trim) is the molding applied where the base cabinet toe kick meets the floor. It covers gaps, protects the finish, and adds a polished, furniture-like detail. Most builder grade cabinets are installed without it, and adding it is one of the fastest ways to elevate the look.
What trim should I use for a shaker-style cabinet door upgrade?
For adding trim to kitchen cabinet doors in a shaker style, use a simple square-edge or slightly beveled stop molding. Cut pieces in a rectangular frame layout, miter the corners at 45 degrees, glue and nail in place, caulk all seams, and paint. The result is an almost indistinguishable replica of a true shaker door at a fraction of the cost.
How do I use quarter round on kitchen cabinets?
Quarter round on cabinets is installed at the base, in the joint between the toe kick face and the floor. Cut outside corners at 45 degrees and inside corners either mitered or coped. Secure with construction adhesive and finish nails. Paint to match the toe kick or baseboard. Kitchen cabinet quarter round is inexpensive, easy to install, and makes a big visual difference.
What are cabinet end panel skins?
Cabinet end panel skins are thin, pre-finished or paintable panels — typically 1/4-inch MDF or wood veneer — designed to be glued over a raw cabinet side. They’re the fastest and most affordable way to finish an end cabinet kitchen face. DIY cabinet end panels using skins are a popular beginner-friendly project.
Is it worth upgrading cabinets instead of replacing them?
In most cases, yes — especially if the boxes are structurally sound. A full cabinet replacement costs $5,000–$30,000+ depending on kitchen size. A comprehensive kitchen cabinets upgrade using paint, cabinet trim, end panels, and molding typically runs $300–$2,000 in materials depending on scope. The ROI is dramatically better, and the results can be nearly indistinguishable from new.
How do I add cabinets to a kitchen for more storage?
You can add cabinets to kitchen runs by ordering filler cabinets, pantry columns, or base extensions to match your existing cabinetry. If an exact match isn’t possible, painting everything the same color unifies mismatched pieces. You can also add on kitchen cabinets above existing uppers to extend them to the ceiling, using kitchen cabinet trim molding to integrate the new addition seamlessly.
What is the difference between cabinet trim and cabinet molding?
These terms are often used interchangeably. Generally, cabinet trim refers to any decorative strip or piece applied to finish or detail a cabinet — including door overlay trim and cabinet side trim. Cabinet molding usually refers to shaped profiles like crown, cove, or ogee used at the top, bottom, or transition points of a cabinet run. Both fall under the broad category of kitchen cabinet decorative trim.
Conclusion
Upgrading your kitchen cabinets doesn’t require a full renovation, a massive budget, or a crew of contractors. As this guide has shown, a strategic combination of cabinet trim, end panel finishing, base molding, door overlay trim, and a quality paint job can turn even the most basic builder grade cabinets into something that looks genuinely custom.
Start with what bothers you most — whether that’s the exposed cabinet sides, the gap at the floor, or the flat, featureless doors — and work from there. The most satisfying kitchen makeovers happen one detail at a time. Adding trim to kitchen cabinets, finishing those neglected end cabinets, and installing proper cabinet base molding are not glamorous tasks on their own, but together they create a kitchen that feels finished, intentional, and beautifully designed.
The best time to start was when you first walked in and thought “these have got to go.” The second best time is right now.