

Introduction
That scratched, water-stained, sticky-feeling table in your kitchen doesn’t have to go to the curb. Learning how to refinish a wooden kitchen table is one of the most satisfying weekend projects a homeowner can take on, and it costs a fraction of what a new table would run you. Whether it’s been in your family for decades or you picked it up secondhand with a finish that’s seen better days, that table has good wood underneath worth saving.
A lot of people assume table refinishing requires professional tools or years of woodworking experience. It doesn’t. With some sandpaper, the right products, and a little patience, almost anyone can bring tired, dull wood back to life. This guide walks through everything from prepping your space to the final protective coat, with practical tips drawn from what actually works (and what tends to go wrong) when people try to refinish a table at home.
By the end, you’ll know exactly how to strip and refinish a table, choose between staining and painting, and avoid the common mistakes that leave DIYers frustrated halfway through. Let’s get into it.
Why Refinish Instead of Replace
Before grabbing the sandpaper, it helps to understand why refinishing a wood table makes more sense than buying new furniture for most people.
Solid wood furniture, especially anything made before the 1980s, is often built from hardwoods that simply aren’t used in mass-produced furniture today. A study by the Furniture Industry Research Association noted that older furniture pieces typically use thicker wood stock and stronger joinery than comparable modern items, which is part of why refinished wood table projects often outlast brand-new purchases. Refinishing also keeps usable material out of landfills, and it’s almost always cheaper than buying a comparable solid-wood piece.
There’s also a sentimental angle. Many people searching for how to restore dining table finishes are working on a piece passed down through their family, and a fresh finish can extend its life for another generation without erasing its history.
Signs Your Table Needs Refinishing
- Cloudy, sticky, or peeling finish
- Deep scratches, water rings, or heat marks
- Faded color from sun exposure
- A finish that feels rough or uneven to the touch
- Visible bare wood patches where the old coating has worn through
If your table shows two or more of these signs, it’s a strong candidate for a full table refinish rather than a quick touch-up.
Gathering Your Tools and Materials
Knowing how to sand and refinish a table starts with having the right supplies on hand before you begin. Stopping mid-project to run to the hardware store breaks momentum and often leads to rushed, uneven work later.
Essential Supplies
- Chemical stripper or sanding equipment (orbital sander, sanding blocks)
- Sandpaper in multiple grits (80, 120, 150, 220)
- Wood filler for cracks or gouges
- Tack cloth or microfiber cloths
- Wood stain or paint of your choice
- Polyurethane, lacquer, or wax topcoat
- Foam or natural-bristle brushes
- Painter’s tape and drop cloths
- Rubber gloves and a respirator mask
- Mineral spirits for cleanup
Working outdoors or in a well-ventilated garage is strongly recommended. Chemical strippers and oil-based finishes release fumes that build up quickly in closed rooms, and the CDC has flagged poor ventilation during furniture refinishing as a common cause of mild chemical exposure symptoms in DIYers.
Step-by-Step: How to Refinish a Wooden Kitchen Table
This is the core process for anyone wondering how do you refinish a table from start to finish. Each phase matters, and skipping steps is the number-one reason refinished pieces look patchy or fail to hold up.
Step 1: Clear the Space and Protect Your Work Area
Move the table somewhere with good airflow, lay down a drop cloth, and remove any hardware, leaves, or extensions. If you’re working on a set, this is also a good time to plan refinish table and chairs as a matched project so the colors stay consistent across pieces.
Step 2: Strip the Old Finish
There are two main routes here, and understanding how to strip a table properly will save you hours of frustration.
Chemical stripping uses a gel or liquid stripper brushed onto the surface, left to sit, then scraped away with a plastic putty knife. This method is faster on tables with thick layers of old varnish or paint and is generally the preferred approach when people ask how to strip and refinish a table that has multiple coats built up over the years.
Sanding skips chemicals entirely and uses an orbital sander with progressively finer grits. It’s slower but avoids the fumes and mess of stripping liquid, making it a popular choice for those exploring how to sand and restain a table in a smaller space like an apartment patio.
Either way, work with the wood grain, not against it, to avoid visible scratch marks in the final finish.
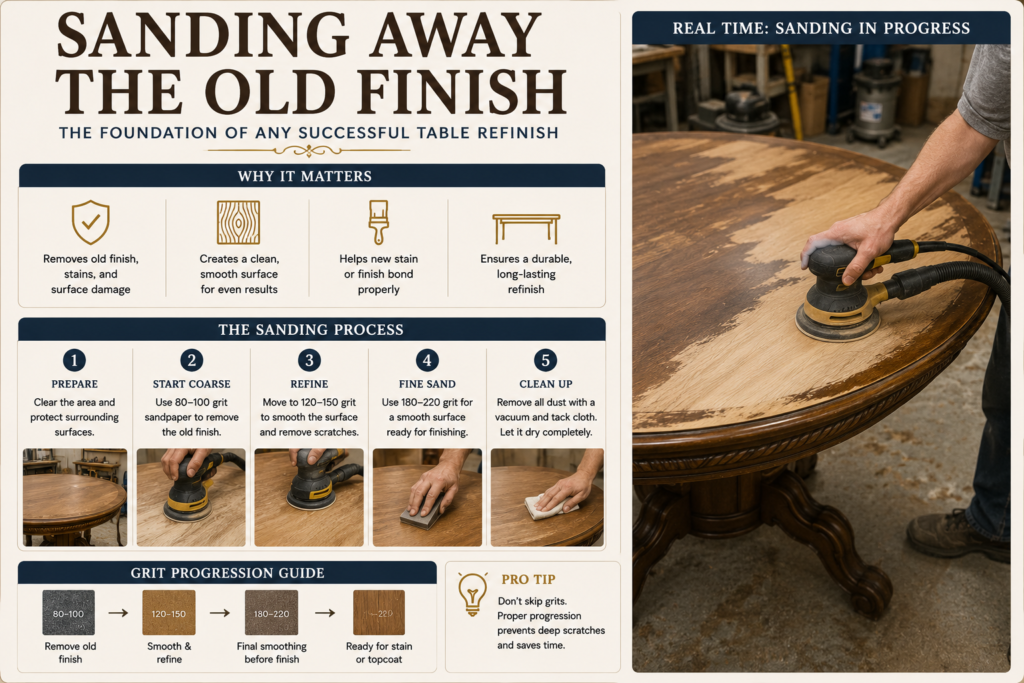
Sanding away the old finish is the foundation of any successful table refinish.
Step 3: Sand the Surface Smooth
Once the old finish is gone, a full sanding pass evens out the wood and opens the grain to accept stain or paint. Start with 120-grit to remove residue, then move to 150-grit, and finish with 220-grit for a silky-smooth surface. This stage is central to any wood table refinishing project, since an uneven sanding job will telegraph straight through your new finish, no matter how nice the stain color is.
Wipe the table down with a tack cloth between grits to remove dust, which otherwise gets trapped under the next coat and creates a gritty texture.
Step 4: Repair Damage
Fill any deep gouges, cracks, or old screw holes with wood filler that matches your intended finish. Let it cure fully, then sand it flush with the surrounding surface. Skipping repairs is one of the most common regrets people mention after attempting how to refurbish a table without addressing structural flaws first.
Choosing Between Staining and Painting
This decision shapes the rest of your project, so it’s worth slowing down here.
How to Stain a Kitchen Table
If the wood grain underneath is attractive, staining preserves and enhances it. Knowing how to stain a kitchen table correctly comes down to applying thin, even coats and wiping off excess stain before it dries tacky.
- Apply a wood conditioner first (especially on softwoods like pine) to prevent blotching
- Brush or wipe stain on with the grain
- Let it sit 5–15 minutes depending on desired depth
- Wipe off excess with a clean cloth
- Allow to dry fully before adding a topcoat (usually 24 hours)
For those specifically asking how to restain a wood table that already has color but looks faded or uneven, a lighter sanding pass followed by a matching or slightly darker stain often blends old and new sections seamlessly.
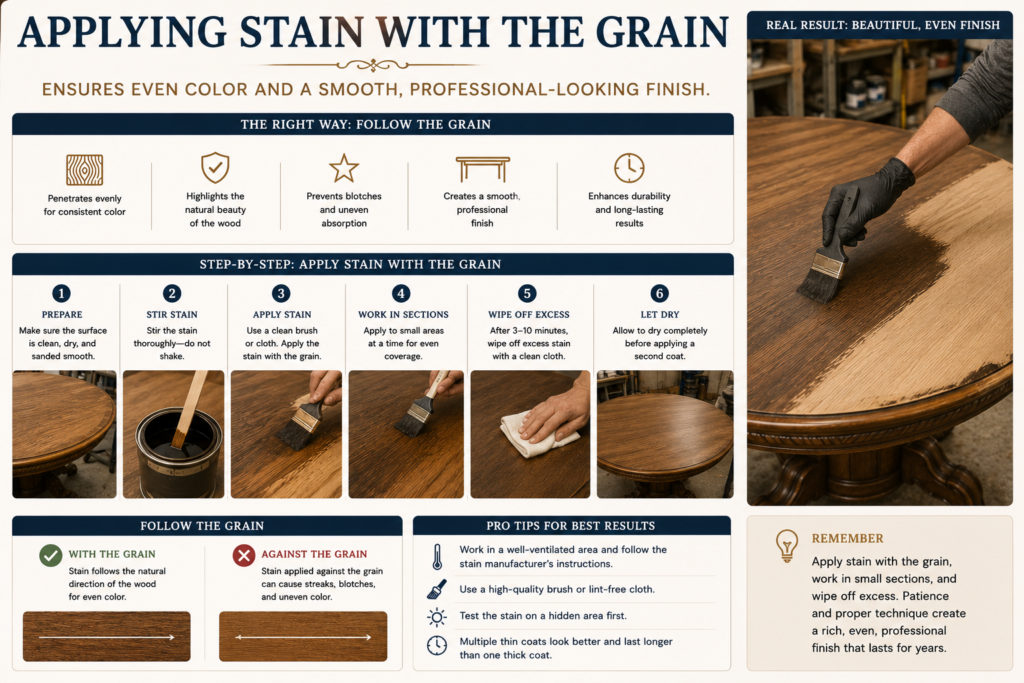
Applying stain with the grain ensures even color and a smooth, professional-looking finish.
How to Repaint a Dining Table
If the wood has mismatched boards, heavy staining, or simply isn’t attractive enough to showcase, painting is the better route. People searching how to repaint dining table finishes often gravitate toward chalk paint or enamel for durability in high-traffic kitchen settings. Two to three thin coats, lightly sanded between each, give the most professional-looking result.
Sealing and Protecting the Finish
A beautiful stain or paint job won’t last in a kitchen environment without proper sealing. Tables face daily wear from hot dishes, spilled liquids, and constant cleaning, so the topcoat matters as much as the color underneath.
Topcoat Options
- Polyurethane – Highly durable, water-resistant, ideal for everyday dining tables
- Lacquer – Fast-drying with a glass-smooth finish, though less heat-resistant
- Hard wax oil – Natural look, easy to spot-repair, but needs more frequent reapplication
- Polycrylic – Low odor, dries clear, works well over painted finishes without yellowing
Apply at least two to three coats, sanding lightly with fine-grit paper between each for the smoothest result. This final stage is what separates a quick refinish table top touch-up from a finish that genuinely holds up to years of family dinners.
Resurfacing vs. Full Refinishing
Not every table needs the full strip-and-stain treatment. If the wood underneath is in decent shape and only the top layer looks tired, a lighter approach to table resurfacing might be enough.
Resurfacing typically involves a light sanding to dull the existing finish, followed by a fresh topcoat, without removing all the old color first. This works well for tables with only minor surface wear. Anyone wondering how to resurface a wood table quickly, without committing to a full weekend project, can often get good results this way in just a few hours.
Full refinishing, by contrast, strips everything down to bare wood and is the better choice for tables with deep damage, mismatched repairs, or a color you want to change entirely.
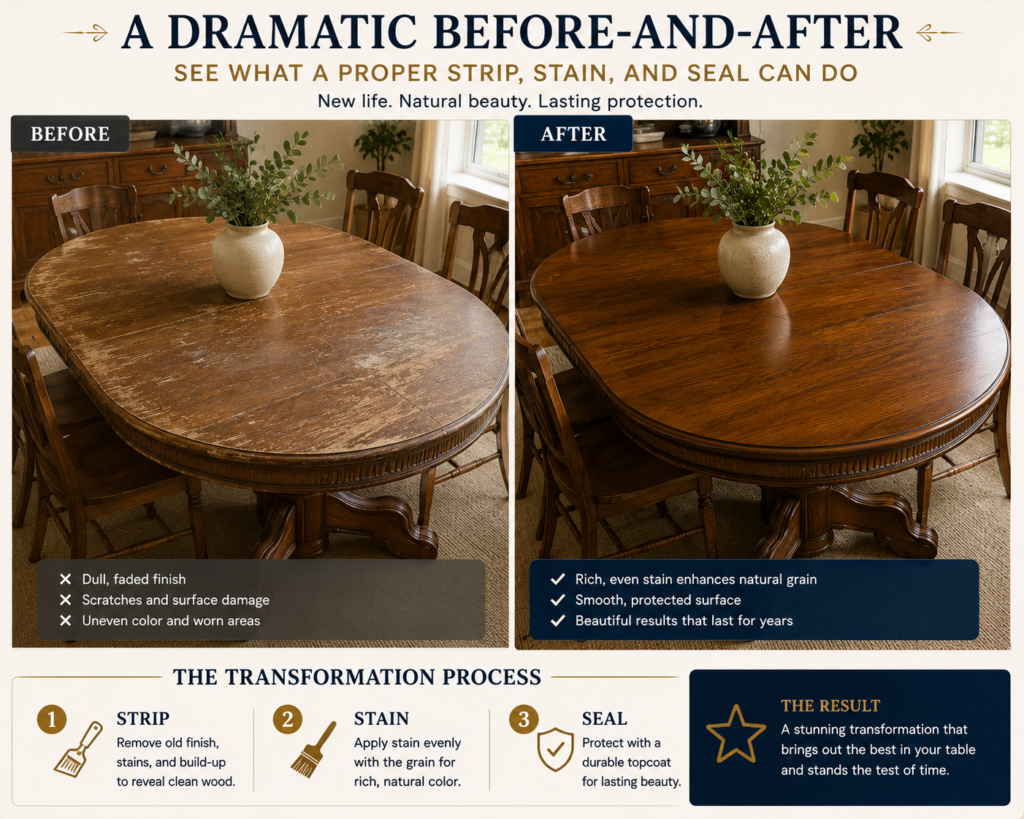
A dramatic before-and-after shows what a proper strip, stain, and seal can do for an old table.
Common Mistakes to Avoid
Even straightforward refinishing wood table projects go sideways when a few key details get overlooked.
- Skipping wood conditioner on soft or porous woods, leading to blotchy stain
- Applying topcoat before the stain has fully cured
- Sanding across the grain instead of with it
- Working in poor ventilation with chemical strippers
- Rushing dry times between coats
- Using a brush with loose bristles that leave streaks in the finish
- Not testing stain color on a hidden spot first
Taking the process slow, especially on dry times, is consistently the difference between an amateur-looking job and one that looks like it came from a furniture shop.
FAQ Section
How long does it take to refinish a wooden kitchen table?
Most projects take a full weekend, factoring in dry times between stripping, sanding, staining, and sealing. Rushing the process is the most common reason finishes fail prematurely.
What’s the best way to refinish a table without sanding?
Chemical strippers can remove old finish without heavy sanding, though a light final sanding pass is still recommended to smooth the surface before staining or sealing.
How do I refinish a table that has water rings or heat marks?
Light sanding usually removes surface-level rings and marks. Deeper damage may require stripping down to bare wood before restaining.
Can I refinish a table without removing all the old finish?
Yes, this is essentially what resurfacing involves. A light sand and fresh topcoat can refresh a table that isn’t heavily damaged.
How do I choose a stain color for refinishing a dining table?
Test a small amount on an inconspicuous spot or scrap wood first, since stain color can look very different on raw wood versus how it appears in the can.
Is it cheaper to refinish a table than buy a new one?
In most cases, yes. Materials for a full refinish typically run far less than a comparable solid-wood table, especially for larger dining tables.
How many coats of polyurethane does a kitchen table need?
Two to three coats is standard for everyday kitchen use, with light sanding between coats for the smoothest, most durable finish.
What grit sandpaper should I start with when refinishing a table?
Start around 80–120 grit to remove the old finish, then progress to 150 and finish with 220 grit before staining or painting.
Conclusion
Bringing an old, worn table back to life is genuinely one of the more rewarding projects a person can take on at home. It takes patience, a few afternoons, and a willingness to work through the steps in order, but the payoff is a piece of furniture that looks better, holds more meaning, and costs far less than starting over with something new. Whether your table just needs a light touch-up or a complete strip-down to bare wood, the process is well within reach for anyone willing to put in the time.