
By a DIY Metalworking & Home Décor Expert
Have you ever picked up a piece of hardware at a thrift store — something with that deep, warm, almost chocolatey glow — and wondered how it got that way? That rich, dimensional quality that new brass just cannot seem to replicate? The truth is, how to age brass is one of those DIY skills that sounds complicated but is genuinely achievable in an afternoon, right at your kitchen table, with ingredients you probably already own. The results can be breathtaking.
There is a real demand for the aged brass finish look right now, and it stretches well beyond interior design trends. Jewelry makers, prop stylists, furniture restorers, and home renovators are all chasing the same thing: that perfect, time-worn patina that communicates character, history, and craftsmanship. Whether you want to tarnish brass on a brand-new lamp, darken brass cabinet hardware to match a Victorian-era kitchen, or simply give a thrift-store find the soul it deserves — this guide covers every reliable technique in detail.
We will move through the science behind how brass actually ages, the essential preparation steps that most guides skip, and every tested method from the classic aging brass with vinegar approach to commercial brass aging solutions you can pick up at any hardware store. By the end, you will have a clear, confident plan for transforming any piece of brass into something that looks genuinely, beautifully old.
How Does Brass Age — The Science Behind That Beautiful Patina
Understanding how does brass age naturally is the foundation of every technique in this guide. Brass is an alloy of copper and zinc — typically around 67% copper and 33% zinc, though the exact ratio varies by grade. When brass is exposed to air, moisture, and the oils from human hands, the copper component begins to oxidize. This electrochemical reaction is what we call tarnishing, and it is the same process that turns pennies from shiny to dull brown over time.
Natural brass aging happens in layers. The outermost surface first develops a very thin layer of copper oxide, which gives brass its warm, slightly matte amber look in the early stages. Over months and years, sulfur compounds in the air react with that oxide to create copper sulfide — the darker, deeper tones responsible for genuine antique patina. In humid or salty environments, verdigris (the blue-green compound) can also develop, especially in the recesses and crevices of decorative pieces.
What does aged brass look like when the process is complete? Genuine aged brass has a beautiful tonal variation: the raised edges and high points tend to stay slightly brighter and more golden because they see more friction and handling, while recessed areas go dramatically darker — often deep brown or near-black. That contrast is what makes antique brass so visually compelling, and it is exactly what the techniques below are designed to recreate artificially.
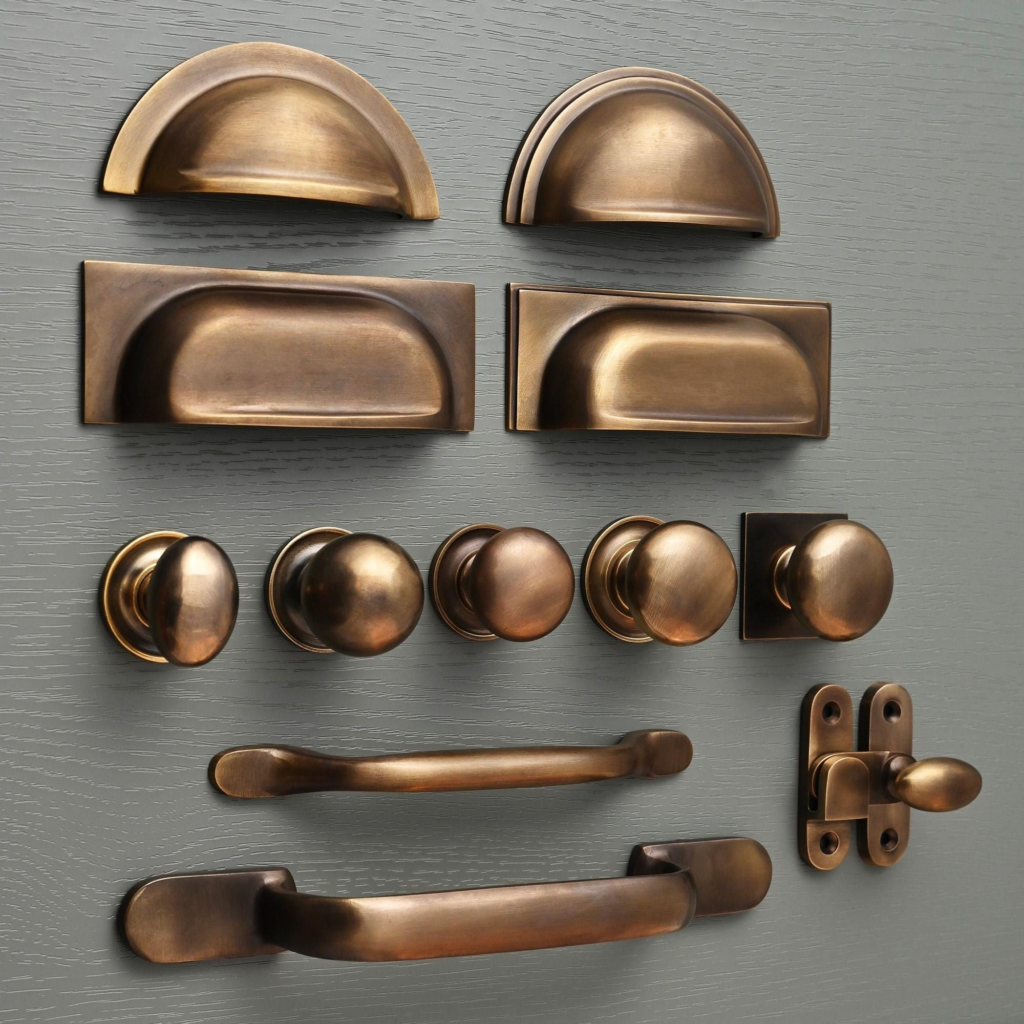
Genuine antique brass hardware showing the layered, tonal patina that develops naturally over decades — and that you can recreate at home in hours.
What Is Aged Brass and Why Does It Look Different From New Brass?
What is aged brass, exactly? The term refers to brass that has developed a patina through either natural oxidation over time or through deliberate chemical or mechanical treatment. Shiny brass — the kind you find on new hardware straight from the factory — has a bright, uniform, mirror-like quality. It reflects light evenly and looks almost gold-like. The patina on aged brass, by contrast, is alive with variation: richer, warmer, more complex. The depth you see is the result of multiple overlapping layers of oxidation, not a single flat surface color.
Most new brass products sold today are also coated with a clear lacquer designed to prevent any natural tarnishing from occurring. This is practical for manufacturers — it keeps the pieces looking pristine in packaging and on showroom shelves — but it creates an invisible barrier that must be removed before any aging brass technique will have any effect. Attempting to oxidize brass or patina brass with vinegar without stripping the lacquer first is one of the most common mistakes beginners make, and it is why so many first attempts end in frustration.
Essential Preparation: Stripping Lacquer Before You Age Brass
Before you can meaningfully age brass using any method, you must confirm whether the piece is lacquered — and if it is, remove that coating completely. This single step makes or breaks the entire project.
How to Test for Lacquer
The easiest test is the acetone swab method. Dip a cotton ball or cotton swab in acetone (standard nail polish remover works perfectly) and rub it firmly on an inconspicuous area of the brass. If the cotton picks up any yellowish or cloudy residue, lacquer is present. If it stays clear and the brass surface underneath looks slightly brighter where you rubbed, you are working with bare metal and can proceed directly to the aging step of your choice.
Removing Lacquer Step by Step
- 1 Gather your suppliesYou will need acetone or lacquer thinner, 0000-grade steel wool, rubber gloves, safety glasses, clean rags, and a well-ventilated workspace. Never work with acetone near open flames.
- 2 Soak and wipe firmlySaturate a clean rag with acetone and rub the entire brass surface with firm, circular pressure. You will notice the cloth picking up a faint yellowish film — that is the lacquer releasing from the metal. Rotate to a fresh section of rag frequently and continue until the cloth stays completely clear.
- 3 Buff with ultra-fine steel woolOnce lacquer-free, go over the surface lightly with 0000 steel wool. This opens up the metal’s crystalline structure just enough to help aging solutions and patina react more evenly. Do not press hard — you are conditioning, not sanding.
- 4 Degrease thoroughlyWash the piece with warm water and dish soap, rinse completely, and dry with a clean cloth. Then avoid touching the bare surface with your fingers — the oils from skin create uneven spots in the final patina.
💡 Pro Tip: For how to age lacquered brass pieces that cannot be fully submerged — like hardware still attached to furniture — use acetone on cotton swabs and work section by section. It is slower, but the results are worth the patience. Small pieces like drawer pulls and hinges are always best removed entirely before any treatment.
How to Age Unlacquered Brass vs. Lacquered Brass
How to age unlacquered brass is genuinely straightforward: the bare metal is chemically reactive and ready to accept a patina as soon as it is clean and degreased. Vintage hardware, antique fixtures, and many artisan-made pieces fall into this category. How to age polished brass or how to age shiny brass (whether lacquered or not) often requires one additional step: a very light pass with 400-grit sandpaper to knock down the mirror finish. A highly polished surface can cause patina solutions to bead up and apply unevenly, much like water beading on a freshly waxed car. The light sanding creates microscopic texture that helps solutions grip and spread evenly.
How to Age Brass Quickly Using Vinegar and Salt — The Classic Method
If you search how to tarnish brass quickly or how to quickly tarnish brass, the vinegar-and-salt fuming method is consistently the most recommended technique — and for very good reason. It works reliably, costs almost nothing, produces a genuinely convincing patina, and is forgiving enough for complete beginners. Professional prop makers, theatrical set designers, and restoration specialists all use variations of this method.
Why Vinegar and Salt Work on Brass
White vinegar is a dilute acetic acid. When brass is exposed to its vapors, the acid reacts with the copper component to begin creating copper acetate compounds on the surface. Salt (sodium chloride) accelerates this reaction dramatically by introducing chloride ions into the mix — a concept borrowed directly from industrial metal finishing. The combination of acetic acid vapor and salt can produce in two to six hours what would naturally take years of environmental exposure. This is why how to age brass with vinegar and salt is the go-to starting point for most DIYers attempting tarnishing brass for the first time.
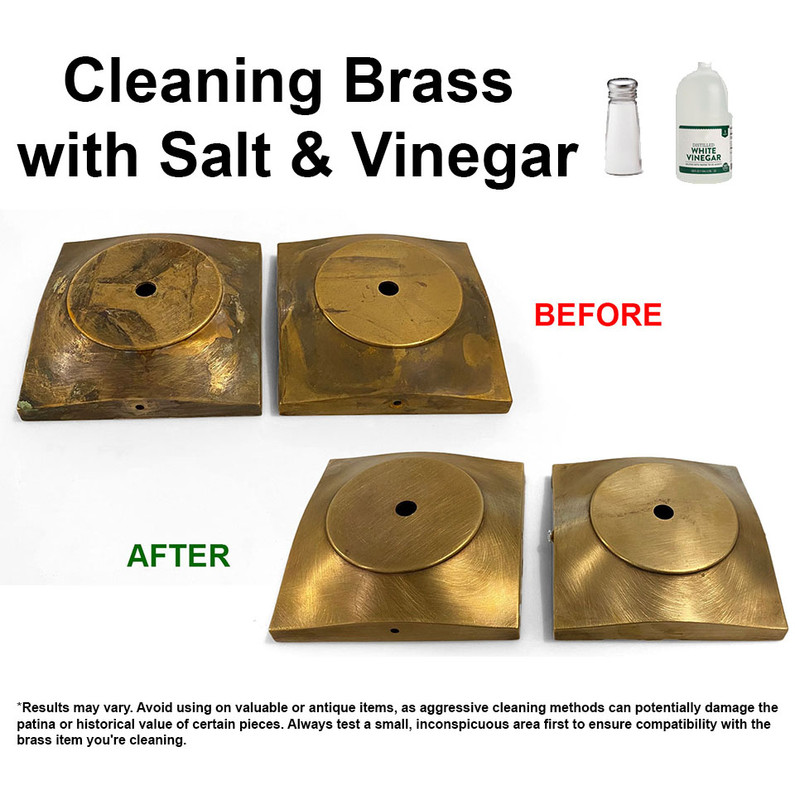
The two humble ingredients behind one of the most effective brass aging techniques — white vinegar and table salt, available in any kitchen.
Vinegar Fuming Method — Step by Step
- 1 Set up a fuming chamberFind a sealable plastic storage bin or container large enough to hold your brass piece without the metal touching the sides. Pour roughly a half-inch of white vinegar into the bottom — enough to produce fumes but not enough to touch the brass directly.
- 2 Add salt to the vinegarStir a tablespoon of table salt into the vinegar until dissolved. This is the accelerant that makes tarnish brass quickly possible — without it the reaction is much slower.
- 3 Elevate the brass above the liquidSupport your piece on a wire rack, crumpled aluminium foil, or small plastic feet — anything that holds it clear of the vinegar. The brass must be in the vapour zone, not submerged in liquid.
- 4 Seal the container and waitClose the lid tightly (or cover with plastic wrap) to trap the fumes inside. Leave undisturbed for two to eight hours depending on how deep you want the darkening brass effect to go. Check every two hours at first.
- 5 Assess, adjust, and sealRemove the piece and examine it under good natural light. If you want more depth, repeat the fuming. If it is too dark, buff lightly with 0000 steel wool to restore highlights. Once satisfied, seal with clear paste wax or matte metal lacquer.
⚡ Speed Tip for Faster Results: For even faster how to age brass quickly results, mist the bare brass surface directly with the vinegar-salt solution using a small spray bottle before placing it in the fuming chamber. Direct contact jump-starts the chemical reaction and can produce visible darkening in as little as 20 to 30 minutes. This is particularly useful when you need to age brass on a tight deadline.
How to Darken Brass: Other Proven Methods Worth Knowing
Vinegar-and-salt is the most accessible technique, but it is far from the only one. Different methods produce different tones, depths, and textures — and some are considerably faster or more controllable than others. Here is a complete look at every reliable approach to darken brass and oxidize brass at home.
Liver of Sulfur — The Jeweler’s Favourite
Liver of sulfur (potassium polysulfide) is the professional metalworker’s choice for how to oxidize brass to a deep, rich, near-black tone. It is widely used in jewelry making and is available in lump or gel form from jewelry supply stores and many online retailers. The results are fast (seconds to minutes rather than hours), highly controllable, and very durable once sealed.
- Dissolve a pea-sized lump in a cup of very hot (not boiling) water
- Dip or brush the solution onto clean, lacquer-free brass
- Watch the color develop rapidly — gold to amber to dark brown to near-black
- Pull the piece and rinse in cold water the moment you reach your target depth
- Burnish high points with fine steel wool for a two-tone antique effect
Liver of sulfur is ideal for how to make brass look old with convincing dark-brown toning. The key to great results is working quickly and rinsing fast — the reaction continues as long as the solution is in contact with the metal, so a few extra seconds can mean the difference between “warm antique brown” and “near-black.”
Aging Brass with Oven Cleaner
Aging brass with oven cleaner is a surprisingly effective technique that most DIYers have never heard of. Products like Easy-Off contain strong alkaline chemicals that react with the copper alloy in brass to produce a rapid, matte darkening effect. The process is simple: spray bare brass generously with oven cleaner, seal it inside a plastic bag, and leave it for four to twelve hours. The result is a dark, even, somewhat matte finish. It is less nuanced than vinegar fuming — fewer highlights and shadows — but it is very fast and particularly effective for how to dull brass large flat surfaces like decorative panels or sheet brass.
How to Use a Commercial Brass Aging Solution
A commercial brass aging solution like Jax Brown, Brass Black, or Birchwood Casey’s Brass Black contains precisely formulated chemistry calibrated for consistent, repeatable results. These products are the professional’s choice when working on large batches — such as a full set of cabinet hardware for a kitchen renovation. As a brass ager Home Depot option, look in the specialty metalworking or painting aisle; availability varies by location, but they are reliably stocked at most jewelry supply and woodworking retailers. A brass ager product typically works in under an hour and produces very even results across matched sets of pieces.
How to Dull Shiny Brass Without Any Chemicals
Sometimes the goal is not dramatic darkening but simply to dull shiny brass or learn how to make shiny brass matte without changing the color significantly. Purely mechanical approaches work beautifully for this:
- 0000 steel wool: Gentle circular buffing removes the mirror finish and creates a soft, satin glow that diffuses reflections without altering the color
- Scotch-Brite pad: Slightly more aggressive than steel wool — good for larger flat surfaces or when you want a more directional brushed texture
- 400 to 600-grit sandpaper: Creates a fine, consistent directional scratch pattern that looks elegant on flat pieces like switch plates or door push plates
- Tumbling with steel shot: For small hardware pieces, a rock tumbler produces a perfectly even frosted surface that looks like satin nickel’s warmer cousin
📊 At-a-Glance Comparison
Brass Aging Methods: Which One Is Right for You?
🧪Vinegar + Salt Fuming
Natural, layered, nuanced patina with light-dark contrast. Best for decorative pieces and hardware.
⏱ 2–8 hrs · Beginner
🌑Liver of Sulfur
Deep brown to near-black. Fast, controllable, professional finish. Widely used in jewelry making.
⏱ Minutes · Intermediate
🏭 Commercial Brass Ager
Consistent, repeatable results for matched sets. Ideal for kitchen hardware renovations.
⏱ 30–60 min · Beginner
🧴Oven Cleaner Method
Fast matte darkening for large flat surfaces. Less nuanced but reliable and very affordable.
⏱ 4–12 hrs · Beginner
🔧 Steel Wool / Mechanical
Dulls without darkening. Great for satin finishes or as a prep step before chemical aging.
⏱ 15–30 min · Beginner
🌿 Ammonia Fuming
Introduces blue-green verdigris tones. Great for outdoor-inspired or ancient bronze look.
⏱ 6–24 hrs · Intermediate
How to Antique Brass Hardware: A Focused Approach
Hardware presents specific challenges that general antiquing brass advice does not always address: pieces need to match each other across a set, they are often small and intricately shaped, and they are usually attached to something when you find them. Here is a targeted guide for how to antique brass hardware and how to darken brass hardware specifically.
Always Remove Hardware Before Aging
Whenever possible, remove hardware from furniture, doors, or cabinets before treating it. Working in place almost always results in uneven aging — the back faces and hidden edges stay bright, while only the forward-facing surfaces darken. The contrast looks unconvincing up close. Removing the pieces entirely means you can treat all sides equally and inspect every surface before sealing.
Getting Consistent Results Across a Matched Set
Consistency is the hardest part of how to age brass hardware across multiple matching pieces. These strategies help enormously:
- Process every piece in the same batch, in the same container, at the same time
- Use a timer and check all pieces simultaneously rather than evaluating them one by one
- Apply the same number of steel wool strokes with the same pressure to every piece when burnishing highlights
- Compare the entire set in natural daylight — indoor lighting shifts color perception and makes matching nearly impossible
- Seal all pieces in the same session with the same product to ensure identical final sheen
How to Age Brass Plated Hardware Safely
Many vintage and budget pieces are not solid brass but rather brass plated hardware — a base metal (usually zinc, aluminum, or steel) with a thin electroplated brass layer over it. For how to age brass plated hardware, the techniques are identical but require considerably more restraint. The plating layer can be only a few microns thick. Aggressive sanding or prolonged chemical exposure can break through to the base metal, creating irreparable damage. Use gentler solutions at shorter exposure times, check every thirty minutes instead of every two hours, and avoid any mechanical abrasion beyond the gentlest possible pass with 0000 steel wool.
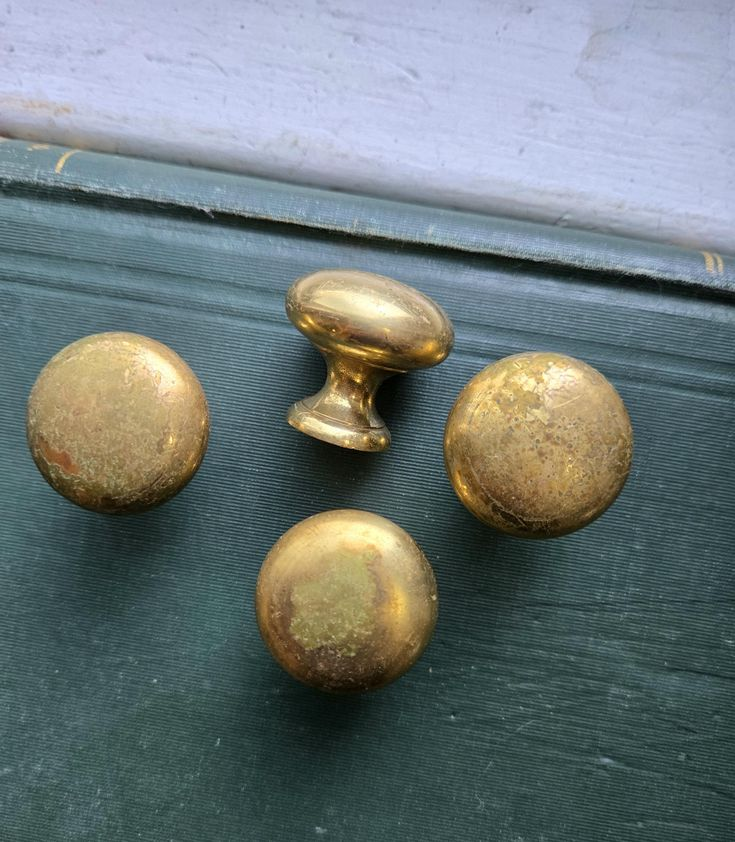
A matched set of antique brass cabinet pulls showing the warm, varied darkening that makes aged hardware so much more visually compelling than anything new off the shelf.
How to Make Brass Look Antique: Advanced Techniques for Truly Convincing Results
If you want results that genuinely pass for the real thing — the kind of finish that makes guests ask where you found that “antique” piece — uniform darkening alone is not enough. Genuine aging is never perfectly even, and the contrast between worn high points and darkened recesses is what creates that compelling, three-dimensional quality. These advanced approaches address exactly that.
How to Distress Brass for Realistic Wear Patterns
Understanding how to distress brass means thinking about where a real piece would show wear over decades of use. Real old brass is brighter where hands have repeatedly touched it — the knobs of cabinet pulls, the edges of door plates, the tops of decorative feet. It is darkest in the corners, recesses, and hidden areas that never see friction. Recreating this pattern convincingly requires selective treatment:
- Strategic sanding before aging: Before applying any chemical, sand only the raised edges and high-contact points with fine sandpaper. These areas will accept less patina and appear naturally worn
- Layered patination: Apply a base patina, seal it lightly, sand the high points again, apply more patina to the recesses with a fine brush, and seal again. Multiple thin layers create the genuine depth that one heavy application cannot
- How to burnish brass: Burnishing brass means using a hard, smooth tool — a burnishing rod, the back of a spoon, or even a smooth river stone — to compress and brighten specific areas. Run it firmly across the high points after aging to recreate the polished-by-use look of heavily handled antiques
- Targeted recess darkening: Apply extra aging solution specifically into corners and crevices using a fine-tipped brush or cotton swab to deepen the shadows that naturally accumulate in recessed areas
How to Change the Color of Brass Beyond Brown
Most aging techniques trend toward amber, brown, and near-black tones, but brass is chemically capable of a much broader palette. How to color brass into unusual tones is entirely possible with the right chemistry. Ammonia fuming introduces blue-green verdigris tones reminiscent of ancient bronze or Mediterranean architecture. Liver of sulfur at different concentrations and temperatures produces a rainbow iridescence — gold to orange to purple to blue-black — that is breathtaking on decorative pieces. How to stain brass a specific non-metallic hue can also be achieved using alcohol-based inks applied over a sealed base patina; this technique is used by theatrical prop-makers and model-makers who need specific, unrealistic colors that still read as “metalwork” on stage or screen.
How to Weather Brass for an Outdoor or Industrial Look
How to weather brass for garden ornaments, architectural accents, or industrial-chic décor involves layering multiple finishing approaches rather than using a single method. A typical weathered brass workflow might look like this: ammonia fuming to introduce base verdigris tones, followed by a liver-of-sulfur dip for darker browns, followed by targeted burnishing of the high points, sealed with an outdoor-rated matte finish. The result is a complex, multi-tonal surface that genuinely looks like it has spent years in the elements.
How to Age Brass Naturally (No Chemicals Needed)
For those who prefer a completely chemical-free approach, how to age brass naturally is simply a matter of time and environment. Strip the lacquer from the piece, then place it in a humid area — a bathroom cabinet or kitchen shelf works well — and handle it regularly with bare hands. The oils, salts, and moisture from skin contact are surprisingly effective at initiating natural tarnishing in exactly the right places. Within two to four months, you will have a genuinely organic patina that no artificial shortcut fully replicates. It requires patience, but the result is uniquely authentic.
How to Patina Brass: Protecting and Maintaining Your Aged Finish
All that careful work deserves proper protection. Sealing is the step most beginners skip — and it is consistently why DIY aging projects look great for a few weeks before evolving unpredictably in ways the owner did not intend.
Choosing the Right Sealant for Your Project
| Sealant Type | Best For | Finish | Durability |
|---|---|---|---|
| Clear paste wax | Decorative pieces, light handling | Soft, natural sheen | Low — reapply annually |
| Matte lacquer spray | Daily-use hardware, door knockers | Very flat, nearly invisible | High — lasts years |
| Linseed or tung oil | Traditional hardware, period restorations | Warm, slight depth | Moderate — reapply every 1–2 years |
| Water-based polyurethane | High-wear pieces, exterior use | Available in matte or satin | Very high — most durable option |
Long-Term Maintenance of a Weathered Brass Finish
Even perfectly sealed pieces benefit from annual maintenance. Wipe hardware with a barely damp cloth and dry immediately — never leave moisture sitting on the surface. Apply a thin fresh coat of paste wax once a year on decorative pieces. Avoid all abrasive cleaners, as they strip patina and force a complete redo. If small bright spots start appearing on high-wear areas, it usually just means the wax has thinned — a quick recoat is all that is needed to restore the look without disturbing the underlying patina layer.
Frequently Asked Questions
How do you tarnish brass quickly at home without special equipment?
The fastest home method requires nothing more than white vinegar, table salt, and a sealable container. Remove any lacquer from the brass, mist the surface with a vinegar-salt solution, place it in the sealed container with a small amount of vinegar in the bottom, and wait. Visible results often appear in 30 to 60 minutes; rich, deep tarnish brass quickly results develop within two to four hours. No special equipment required.
What does aged brass look like compared to new polished brass?
New shiny brass has a bright, uniform, mirror-like golden tone. Aged brass has warm amber to deep brown tones with natural variation — lighter on raised edges and high-contact areas, darker in recesses and corners. The tonal contrast creates visual depth that flat, polished brass simply cannot replicate, which is why antique finishes are so sought-after in interior design.
Can I age brass that is still attached to furniture or a door?
You can, but results are less even. For pieces that cannot be removed, use acetone on cotton swabs to strip the lacquer section by section, then apply a brass aging solution with a brush or cotton swab to control exactly where the darkening occurs. The result will be slightly less natural-looking than a fully detached piece treated by fuming, but it is perfectly acceptable for most situations.
Is there a difference between how to antique brass hardware and how to patina brass?
The terms are often used interchangeably, but there is a subtle distinction in practice. Antiquing brass specifically refers to replicating the look of genuinely old, historically styled hardware — usually involving strategic light-dark contrast and selective burnishing. How to patina brass is a broader term that covers any deliberate application of surface oxidation, including unusual colors like verdigris or iridescent rainbow tones that would not occur on a period antique.
How do I make brass look antique without chemicals?
The most effective chemical-free approach uses mechanical means: strip the lacquer, buff with 0000 steel wool to create a soft satin surface, then apply dark brown or black shoe polish into the recesses. Buff off the high points once dry, leaving residual color in the low areas. The resulting shadow depth can be surprisingly convincing — no chemicals required. This approach is particularly useful for how to make brass look old quickly on large or delicate pieces where chemical control is difficult.
What is the difference between aging brass plated hardware and solid brass?
The techniques are the same, but the margins for error are very different. Solid brass can withstand more aggressive chemical exposure and mechanical abrasion because the metal goes all the way through. Brass plated hardware has a very thin layer — sometimes just a few microns — of brass over a different base metal. Aggressive treatment can break through to the base, creating irreversible damage. Always use shorter exposure times, gentler solutions, and minimal steel wool on plated pieces.
How long does a DIY aged brass finish last once sealed?
A properly sealed aged brass finish can last many years with minimal care. Paste wax offers the easiest maintenance path, typically needing reapplication once a year for frequently handled pieces. Matte lacquer provides a harder, longer-lasting seal that may go three to five years on daily-use hardware before showing any wear. The patina underneath the seal is stable indefinitely — it is the sealant layer that eventually needs refreshing, not the patina itself.
Can I reverse the process if the brass goes too dark?
Absolutely. Metal polish — products like Brasso, Bar Keepers Friend, or even a paste of flour, salt, and white vinegar — will remove patina and lighten the tone. Work slowly with a soft cloth and check frequently. You can also use 0000 steel wool to selectively lighten specific areas, restoring the bright highlights on raised edges while leaving the recesses dark for a natural antique contrast. Nearly every mistake in the aging process can be partially or fully corrected.
Conclusion
The art of knowing how to age brass sits at a satisfying intersection of chemistry, craft, and patience — and it is far more accessible than most people assume. Whether you are tarnishing brass hardware to complete a period-accurate kitchen renovation, giving a thrift-store lamp the gravitas it always deserved, or creating decorative pieces with an heirloom quality from scratch, the techniques in this guide give you everything you need to get professional results at home.
The fundamentals are simple: strip the lacquer completely, choose the aging method that suits your timeline and desired depth, work methodically on matched pieces in the same batch, and always seal your results to preserve them. Beyond those basics, aging brass is an enormously forgiving craft — too dark can be lightened, too light can be deepened, and almost every mistake has a solution.
So the next time you look at a piece of gleaming, flat, factory-fresh brass and feel that it lacks something — character, warmth, history — remember that all of that is entirely within your power to add. A few hours, a bottle of vinegar, and a handful of salt might be all that stands between you and the most beautiful thing in the room.