
Picture this: you walk into a bedroom, and the entire wall is lined with seamless, floor-to-ceiling wardrobes that look like they were built by a master carpenter. You assume it cost thousands. Then you learn the secret — it’s an IKEA fitted wardrobe hack that cost less than £600. Jaw drop. That’s the magic of what thousands of clever homeowners are doing right now, and this guide will show you exactly how to pull it off yourself.
The IKEA fitted wardrobe hack — most commonly built around the PAX wardrobe system — has taken the interior design world by storm. From Instagram to Pinterest, bedrooms transformed with a built-in PAX wardrobe are racking up hundreds of thousands of saves, and for good reason. Custom built-in wardrobes from a joiner can easily cost £3,000–£10,000 or more. The IKEA version? A fraction of that, with near-identical results when done right.
Whether you’re a seasoned DIYer or someone who has never picked up a drill in your life, this guide breaks down everything you need to know — from planning your pax built in wardrobe to the finishing touches that make it look truly bespoke. We’re talking fillers, crown moulding, baseboard tricks, paint, and door upgrades that completely transform the standard flat-pack look into something that genuinely fools even professional interior designers.
Let’s get into it.

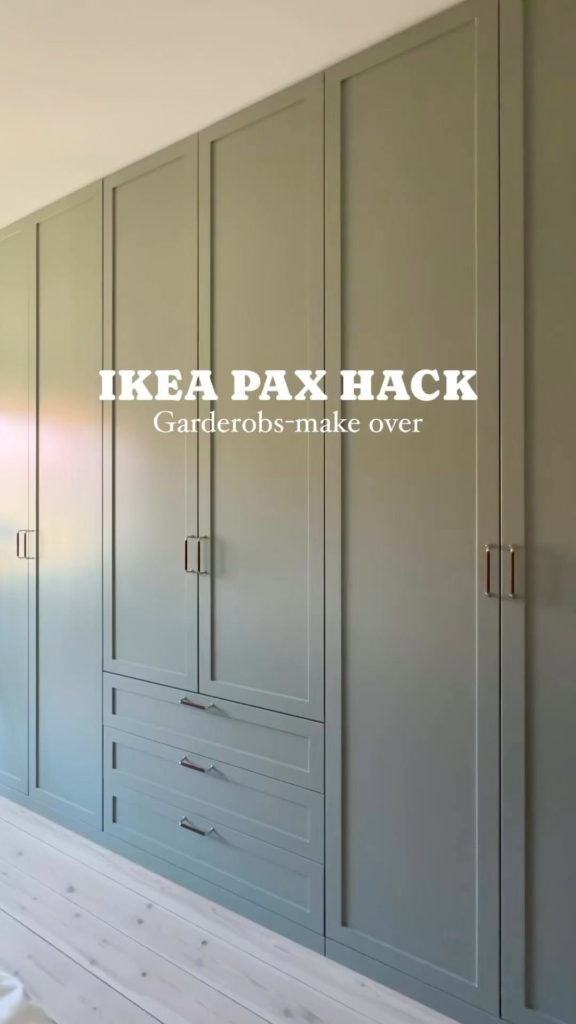
A seamless floor-to-ceiling IKEA PAX built-in wardrobe — with the right finishing touches, these units are virtually indistinguishable from bespoke custom joinery.
Why the IKEA PAX System Is the Foundation of Every Great Built-In Wardrobe Hack
Before we dive into the how-to, it’s worth understanding why the IKEA PAX wardrobe system is so well-suited to this kind of transformation. PAX frames come in three widths (50cm, 75cm, and 100cm) and two heights (201cm and 236cm), and they’re designed to be modular. That means you can line up multiple units side by side and, with the right finishing touches, make them look like a single, continuous structure.
The PAX system also has an enormous range of interior fittings — drawers, shelves, pull-out trouser hangers, shoe racks, glass doors, mirrored doors — which means your ikea built in closet doesn’t just look good on the outside; it can be genuinely well-organised on the inside. This flexibility is something even expensive custom wardrobes sometimes struggle to match at the same price point.
PAX vs. Custom Joinery: The Honest Comparison
Many homeowners are initially reluctant to go down the ikea pax built in route because they associate IKEA with a flat-pack, student-bedroom aesthetic. That reluctance usually disappears very quickly once they see the before-and-after photographs. The key insight is this: what makes a wardrobe look ‘built in’ has less to do with the carcass (the box itself) and everything to do with the detailing — the scribing to the wall, the cornice at the top, the plinth at the bottom, and the quality of the doors.
| Solution | Typical Cost (3m wall) | Lead Time | Customisation |
| Custom Joiner | £3,500 – £10,000+ | 6–12 weeks | Unlimited |
| IKEA PAX Built In Hack | £500 – £1,800 | 1–2 weekends | High |
| Ready-made fitted wardrobes | £1,200 – £4,000 | 4–8 weeks | Limited |
The numbers speak for themselves. And while a custom joiner will always have the edge in terms of being able to work around genuinely unusual architectural features, the ikea pax hack built in method handles the vast majority of bedroom layouts with remarkable ease.
Planning Your IKEA Fitted Wardrobe Hack: Measurements, Layout, and the PAX Configurator
Good results start with meticulous planning. One of the most common mistakes in a diy built in wardrobes ikea project is jumping straight to the store without precise measurements. An error of even a centimetre or two can mean a gap between your wardrobe and the wall, or worse — units that won’t fit at all.
How to Measure Your Wall Correctly
Start by measuring your wall at three heights — near the floor, at mid-height, and near the ceiling — because walls in older homes are rarely perfectly straight. Take the smallest measurement as your working width. You’ll also need to measure the height in multiple spots along the wall, as floors and ceilings can slope more than you’d expect. Note where any skirting boards, plug sockets, light switches, or heating elements are, as these will all need to be accounted for in your pax built in design.
- Measure width at floor, mid, and ceiling level — use the smallest figure
- Measure floor-to-ceiling height at each corner and the centre
- Map the locations of all sockets, switches, and pipes
- Note any alcoves, chimney breasts, or awkward corners
- Decide whether you want a pax walk in wardrobe or a wall-to-wall run
Using the IKEA PAX Planner
IKEA offers a free online PAX planner tool that lets you design your ikea pax wardrobe layout in 3D before you spend a penny. This is invaluable for a pax fitted wardrobe hack project. You can play around with different unit widths, test interior configurations, and see how your design will look in situ. It also automatically generates a parts list, which makes shopping much simpler.
💡 Pro Tip: When using the PAX planner for your ikea pax fitted wardrobes design, always select the 236cm height option if your ceilings allow it. Taller units look significantly more architectural and make it far easier to achieve that seamless floor to ceiling wardrobes ikea look with a small cornice filler at the top.
The Filler Panel Strategy: How to Fill the Gap
Unless your wall measurement happens to be a perfect multiple of PAX widths (unlikely), you’ll have a gap somewhere. This is where many first-timers panic — but seasoned ikea wardrobe hacks builders know exactly what to do: use filler panels. You can cut MDF or plywood to fill any remaining gap and paint it to match, so the finished result looks like it was always meant to be there. For the ikea pax in existing closet scenario, the same principle applies — infill around the units with scribing strips to get a completely snug fit.
The 6 Steps to a Perfect IKEA PAX Built-In Wardrobe
| Step | Action | Detail |
| 1 | Measure & Plan | Wall dimensions + PAX Planner |
| 2 | Remove Skirting | Boards & prep the wall |
| 3 | Assemble & Fix | Units together + secure to wall |
| 4 | Add Filler Panels | Fill gaps, scribe to wall |
| 5 | Cornice & Plinth | Top + bottom mouldings |
| 6 | Doors & Handles | Paint, upgrade, style |
Step-by-Step: How to Make IKEA PAX Look Built In
This is the section you came for. Below is a comprehensive, step-by-step process for executing an ikea pax built in hack that will genuinely look like it was fitted by a professional. Take your time with each stage — the difference between a result that looks ‘IKEA’ and one that looks ‘custom’ almost always comes down to the finishing details.
Step 1 — Removing the Skirting Board
The single biggest visual giveaway that a wardrobe isn’t truly built in is when it sits on top of the skirting board, creating a gap at the back. The way to avoid this is to remove the skirting board in the relevant section of wall before you install the pax wardrobe built in units. Run a utility knife along the top edge of the skirting first to cut through any paint or caulk, then use a wide putty knife and a small pry bar to lever it away gently. Save the skirting — you may be able to reuse sections of it along the sides of the wardrobe run to maintain a consistent look.
If you don’t want to remove the skirting — perhaps you’re renting, or the skirting is particularly ornate — you can cut a notch into the base of the PAX frame to sit over the skirting instead. This is slightly more fiddly but achieves a similar result. Both approaches are well-documented in the ikea wardrobe hacks uk community.
Step 2 — Assembling and Fixing the PAX Frames
Assemble each PAX frame flat on the floor following the IKEA instructions, but leave out the back panel for now — it makes the units significantly lighter to carry and position. Once you’ve assembled the carcasses, stand them up against the wall and check for level both horizontally and vertically. PAX feet are adjustable, which makes levelling on uneven floors much easier.
Once everything is level, fix the units together by drilling through the sides of adjacent frames and using machine screws to bolt them firmly together. Then anchor the entire run to the wall using L-brackets screwed into wall studs. For a true built in pax wardrobe finish, you want this thing rock solid — there should be zero movement when you open and close doors.
Step 3 — Scribing and Filling the Sides
Scribing is the process of cutting the edge of a panel so it follows the exact contour of an uneven wall, eliminating the gap between the wardrobe and the wall surface. This is the technique that professional fitters use, and it’s what separates a truly polished built in ikea wardrobe from one that looks amateur.
To scribe a filler panel, hold it in position next to the wall with a small gap where it meets the wall surface. Run a compass or a scribe tool along the wall with a pencil on the panel side — this transfers the wall’s profile onto the panel. Cut along this line with a jigsaw, test the fit, and adjust as needed. Done well, this technique creates a seamless join that makes it genuinely hard to tell where the wall ends and the wardrobe begins, which is the whole goal of how to make ikea pax look built in.
Scribing panels flush to the wall and fitting cornice moulding along the top are the two steps that transform a row of flat-pack units into a true built-in wardrobe.
Step 4 — Adding the Cornice (Crown Moulding) at the Top
The cornice is arguably the most transformative single element of any ikea pax built in wardrobe project. A simple length of MDF cornice or plaster coving, fixed along the top of the wardrobe run and painted to match the walls or the wardrobe, instantly gives the structure a fully architectural quality. For a floor to ceiling wardrobes ikea look, measure and cut the cornice at 45-degree angles at any external corners, using mitre saw cuts, and fix in place with no-more-nails adhesive and finishing nails.
The gap between the top of the PAX frames and the ceiling is filled first with an MDF panel cut to size, then the cornice is applied to the front face of this panel. Caulk all the joints, sand smooth when dry, and prime before painting. When finished, this creates the illusion that the wardrobe is rising seamlessly from floor to ceiling — a key marker of the truly how to make pax look built in effect.
Step 5 — Replacing the Base / Plinth
Just as the cornice closes the top gap, a continuous plinth closes the bottom. Standard PAX units come with small adjustable feet, but for a fully built in wardrobe look, you want to build a plinth from MDF that runs across the entire base of the wardrobe, mimicking the kind of kickboard you’d see on custom-fitted furniture. This plinth is typically 100–150mm high and protrudes slightly in front of the PAX frame — it hides the feet, gives the wardrobe visual weight, and echoes the skirting boards elsewhere in the room.
Step 6 — Door Upgrades and Hardware
Standard PAX doors are perfectly serviceable, but if you want your ikea pax wardrobe hack built in to truly transcend its flat-pack origins, the doors are where you should invest. There are several routes here. First, you can simply paint the standard PAX doors (they take paint well with proper primer) in any colour you like — a classic shaker-style grey or a deep navy can look outstanding. Second, you can upgrade to aftermarket doors specifically designed to fit the PAX system; companies like Superfront, Reform, and Plykea all offer beautifully made door fronts in a range of materials and styles that transform the wardrobe’s whole appearance.
For a truly custom look, consider adding panelling detail to plain PAX doors using router-cut MDF sections glued on and painted — this is one of the most popular ikea pax doors hack techniques on social media right now, and the results genuinely look like high-end custom cabinetry. Finish with new handles — even the choice of hardware makes a substantial difference to the overall feel.
How to Customise IKEA PAX Interiors for Maximum Organisation
All the exterior work in the world won’t matter if the inside of your built in ikea pax wardrobe doesn’t actually serve your storage needs. IKEA’s PAX interior system is one of its strongest suits — the range of fittings is enormous and the quality, for the price, is genuinely good. Here’s how to think about how to customize ikea pax interiors intelligently.
Zoning Your Wardrobe
The best-organised wardrobes divide the space into clear zones based on what’s being stored. A typical approach for a large pax fitted wardrobe hack might look like this: one section devoted to long hanging (coats, dresses, suits); one to short hanging (shirts, jackets) with a drawer unit or shelving below; and one to folded items, shoes, or accessories. Having this structure in mind from the planning phase means you choose the right PAX interior configurations from the outset, rather than finding yourself with miles of hanging space and nowhere for your shoes.
- Long hanging zone: minimum 150cm drop for dresses and coats
- Short hanging + drawers: shirts, folded trousers, suits
- Shelving zone: folded knitwear, bags, hatboxes
- Shoe zone: pull-out trays or angled shoe shelves
- Accessories: tie racks, jewellery inserts, belt hooks
Lighting Inside the Wardrobe
IKEA’s OMLOPP LED strip lights are designed specifically to fit PAX wardrobes and make a significant difference to usability — being able to see everything in your ikea pax closet clearly means you actually use it more effectively. Battery-powered puck lights also work brilliantly for a quick-install option with no wiring. If you want something more premium, low-voltage LED tape fitted along the internal frame edges can be connected to a mains switch and creates a showroom-quality effect.
💡 Pro Tip: For ikea wardrobe hacks uk, note that standard UK ceiling heights of 240cm pair perfectly with the 236cm PAX frames, leaving just 4cm to fill with a cornice fillet — almost as though IKEA designed it specifically for this purpose. If your ceilings are lower, the 201cm frames work beautifully too; you’ll just need a deeper cornice section to fill the gap.
Bedroom IKEA PAX Hack: Style Inspiration and Real-World Transformations
One of the most powerful arguments for the bedroom ikea pax hack is the sheer variety of looks you can achieve. Below are some of the most popular aesthetics that people are executing with this method.
The Classic White Shaker
White shaker-style doors, chrome or brushed nickel bar handles, and a cornice painted to match the walls: this is the most universally appealing version of the ikea built in wardrobe hack, and for good reason. It works in virtually any style of room, from period properties to new builds, and has a timeless quality that won’t date the way a more trend-forward look might.
The Moody, Dark Bedroom Statement
Navy, deep forest green, charcoal, or even black wardrobes are having a major moment. A built in wardrobe ikea painted in Farrow and Ball’s Railings or Studio Green, with brass hardware and a matching cornice, creates a dramatic, hotel-like focal point that makes a bedroom feel genuinely luxurious. The contrast between dark wardrobe doors and lighter walls is particularly effective in larger bedrooms.
The Japandi-Inspired Minimal Look
For those who love the Japandi aesthetic — the Japanese-Scandinavian hybrid that’s dominated interior design in recent years — an ikea pax wardrobe hack with handleless flat-front doors in a warm greige or natural oak veneer, paired with push-to-open hinges, is a perfect execution. The clean lines of the PAX system lend themselves naturally to this style, and the lack of visible handles reinforces the pared-back, architectural quality.
The Walk-In Wardrobe Transformation
The pax walk in wardrobe configuration — where PAX units are arranged in a U-shape or L-shape within a dedicated room or large alcove — is the holy grail for many homeowners. It’s entirely achievable with the PAX system, and the addition of an island unit (which you can build from PAX drawer units topped with MDF) in the centre creates a look straight out of a high-end hotel suite. This is the most ambitious version of the diy built in wardrobe project, but also the most rewarding.
Common Mistakes to Avoid in Your IKEA PAX Built-In Wardrobe Project
Even the most well-planned ikea pax diy project can run into trouble. Here are the most common pitfalls and how to avoid them.
Not Accounting for Ceiling or Floor Unevenness
This is the number one problem. Many people measure once at one point and assume the entire room is that dimension. It isn’t. Always measure in multiple places and build your design around the minimum, not the maximum — you can always fill a gap, but you can’t compress a unit that’s too tall by 2cm. Use the adjustable PAX feet to compensate for floor slopes rather than shimming with bits of wood.
Skipping the Wall Fixing Step
A pax built in closet that isn’t fixed to the wall is both a safety hazard and structurally unconvincing — wardrobes that wobble when you open the door aren’t going to fool anyone into thinking they’re built in. Always use appropriate wall fixings into studs or masonry, and connect adjacent units to each other. This is non-negotiable.
Using the Wrong Paint Without Primer
PAX surfaces are foil-wrapped, and standard emulsion won’t adhere properly without a suitable primer. Use a bonding primer first, then your chosen paint, or choose a purpose-made furniture paint that doesn’t require a separate primer. Skipping this step leads to chipping and peeling within months — undermining all your hard work on the ikea fitted wardrobes hack.
Ignoring the Internal Organisation
A wardrobe that looks beautiful from the outside but is poorly organised inside will frustrate you every day. Take the time to plan the interior properly using IKEA’s configurator, and don’t be afraid to mix and match fittings. The beauty of the ikea closet built ins approach is that you can always change the internals as your needs evolve.
The Cost Breakdown: Building a Wall of Wardrobes on a Real Budget
One of the most searched questions about the ikea pax hack is how much it actually costs when you add up all the materials. Here’s a realistic breakdown for a 3-metre wall of wardrobes using three 100cm PAX frames with BERGSBO doors, which is one of the most popular configurations.
| Item | Quantity | Approx. Cost |
| PAX frames (100cm × 236cm × 58cm) × 3 | 3 | £270 |
| BERGSBO or GRIMO doors × 6 | 6 | £240 |
| Interior fittings (shelves, drawers, rail) | — | £120 |
| MDF for filler panels, cornice, plinth | — | £60 |
| Paint, primer, caulk, fixings, handles | — | £80 |
| Total | ~ £770 |
Upgrading to third-party doors (from Superfront, Plykea, etc.) would add £200–£500 to this figure, but even at the top end, you’re looking at a result that genuinely rivals wardrobes costing five or six times as much. For those in the UK wondering about ikea pax hack built-in uk specific costs, add roughly 10–15% compared to US pricing, which still makes the project extremely compelling.
“The most expensive thing in this bedroom is the bed frame — and even that was IKEA. The wardrobes look custom. Everyone who visits assumes we spent a fortune.” — A homeowner from Leeds, UK, sharing their built in pax wardrobe project online.
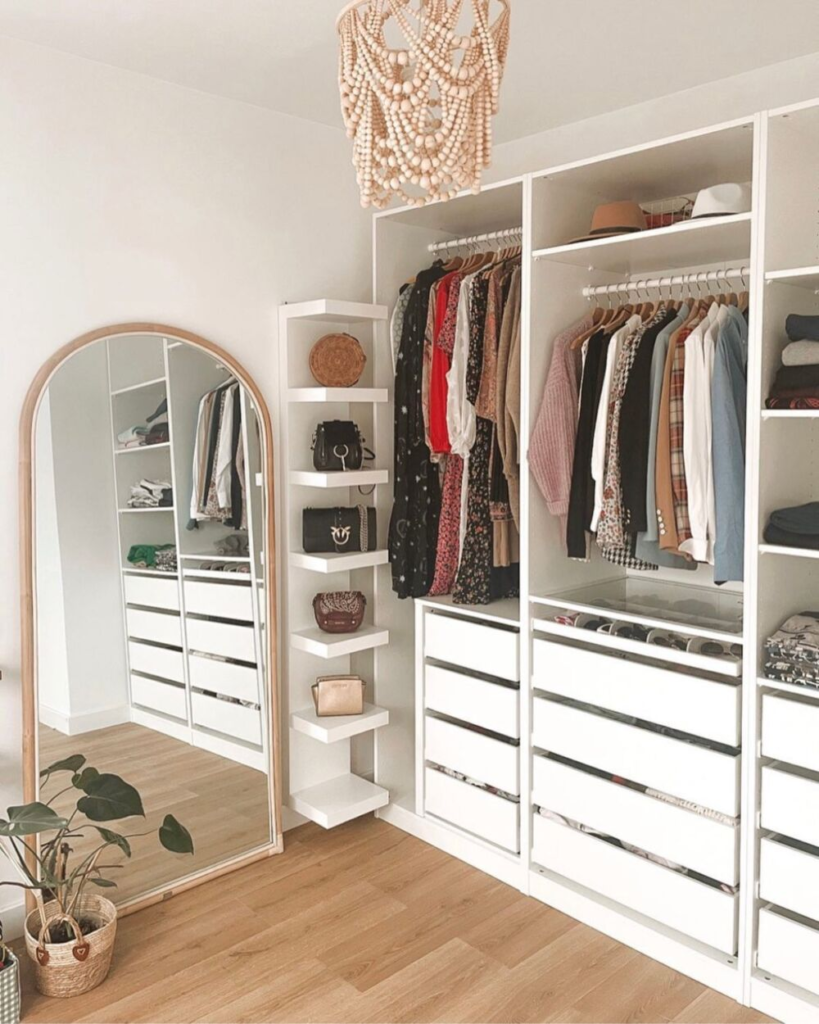
A PAX walk-in wardrobe configuration styled with open shelving, neutral tones, and internal lighting — it feels more like a boutique dressing room than a standard bedroom wardrobe.
Frequently Asked Questions About the IKEA Fitted Wardrobe Hack
How do I make my IKEA PAX wardrobe look built in?
The key to how to make ikea pax look built in is a combination of four elements: removing (or notching around) the skirting board so the unit sits flush to the wall; scribing filler panels to eliminate any side gaps; adding MDF cornice moulding across the top to close the ceiling gap; and applying a consistent paint finish across the units, cornice, and surrounding walls. Done together, these steps make it virtually impossible to tell the wardrobe from bespoke joinery.
Can I use IKEA PAX in an existing alcove or closet?
Absolutely — ikea pax in existing closet projects are extremely popular and often produce the cleanest results because the walls on three sides naturally contain the wardrobe. The main task is cutting filler panels to scribe into the alcove walls, as older alcoves are rarely perfectly square. Take your measurements carefully from multiple points and cut your infill panels to the smallest measurement to ensure a snug fit.
What tools do I need for a PAX built-in wardrobe hack?
For a well-executed ikea pax diy built-in project, you’ll need: a tape measure, spirit level, drill with appropriate bits, jigsaw (for cutting MDF fillers), mitre saw or mitre box (for cutting cornice at 45 degrees), no-more-nails adhesive, caulk gun and paintable caulk, sandpaper, and a quality paint brush or roller. If you don’t own a jigsaw, many hardware stores and tool libraries offer day hire.
Do I need to remove the skirting board for a PAX built-in hack?
Removing the skirting board produces the cleanest result, but it’s not absolutely mandatory. If you prefer not to remove it — for instance in a rented property — you can cut a notch into the base of the PAX frame so it sits over the skirting. This requires more precision but eliminates the gap and achieves a very similar aesthetic. The ikea wardrobe hack built in community has documented both approaches in detail.
Can I upgrade the doors on my IKEA PAX wardrobe?
Yes — and this is often the single most impactful upgrade you can make to an ikea pax wardrobe hack. Companies like Superfront, Plykea, and Reform make premium door fronts that are designed to fit PAX frames precisely. Alternatively, you can paint standard PAX doors with a bonding primer and furniture paint, or add MDF panelling details to create a shaker or panelled effect. For an ikea pax doors hack that really wows, also consider replacing the handles — it makes a surprisingly big difference to the overall look.
How much does an IKEA PAX built-in wardrobe hack cost?
For a typical 3-metre run using standard PAX frames and IKEA doors, the total cost including all materials sits around £600–£900 in the UK. Using upgraded third-party doors and premium handles can push this to £1,200–£1,500 — still a fraction of custom-fitted wardrobe costs. A pax fitted wardrobes configuration with more storage fittings inside will cost more, but the economies of scale are very favourable.
Is the IKEA PAX built-in wardrobe hack safe and structurally sound?
When done properly, yes — absolutely. The critical safety step is securing the build ikea wardrobe units both to each other (through the side panels) and to the wall behind using L-brackets and appropriate fixings. This prevents any risk of tipping. IKEA also sells anti-tipping straps specifically designed for the PAX system, which provide an additional safety measure, particularly important in households with children.
What is the best PAX height for a floor-to-ceiling look?
The 236cm PAX frames are the better choice for a floor to ceiling wardrobes ikea look in homes with standard UK ceiling heights of 240cm. The 4cm gap is easily filled with a slim cornice fillet, and the overall result is dramatically more architectural than the 201cm option. If your ceilings are lower than 230cm, the 201cm frames are appropriate and will still look excellent with a deeper cornice section at the top.
Can I use the IKEA PAX hack to build a walk-in wardrobe?
Yes — a pax walk in wardrobe is entirely achievable. The most common approach is to line three walls of a room or large alcove with PAX frames, potentially adding a central island unit built from stacked PAX drawer frames topped with MDF. This creates a dressing room environment that, with good lighting and the right door choice, looks extraordinary. Plan the layout carefully using the PAX online configurator to ensure you have adequate circulation space between opposing runs of wardrobes.
Conclusion: Your Built-In Wardrobe Awaits
There was a time when built-in wardrobes were the exclusive domain of people with big renovation budgets and a joiner on speed dial. The ikea fitted wardrobe hack has changed that completely. Today, with a few IKEA flat-pack boxes, some MDF, a tin of paint, and a weekend, almost any homeowner can transform a bedroom wall into something that looks like it belongs in an architectural magazine.
The beauty of the ikea pax built in wardrobe approach is that it scales with your ambition. You can keep it simple — three frames, a coat of paint, a cornice strip — and still achieve a transformation that stuns anyone who sees it. Or you can go deep: scribing every panel, upgrading to premium doors, fitting internal lighting, and building a plinth that perfectly echoes your skirting boards. Either way, the result is a built in wardrobe that makes your bedroom feel genuinely finished.
The most important thing is to start. Measure your wall, open the PAX planner, and begin sketching out your design. You’ll quickly realise that what seemed like an ambitious project is actually very manageable — and the moment you stand back and look at the finished result, the satisfaction is immense. This is one of the best-value home improvement projects available to anyone, and the IKEA PAX system makes it more accessible than ever. Happy building.